
Windows 10 is the most popular operating system. Millions of users are working with it, all over the world. Even Microsoft is putting all the resources to keep Windows 10 updated, but there are still some outbreaks. Recently the users have reported microphone issues in Windows 10 latest version. This problem is not new and people have been facing issues related to the microphone for a long time. If you are also experiencing the internal microphone not working issue, then we have got you covered.
There are various reasons behind auditory problems in Windows 10 and so we have covered all the possible ways to resolve the issue.
How to Resolve Microphone Issues in Windows 10?
There are various ways by which you can troubleshoot the audio problems with the microphone. And so you will have to work your way down and try all the methods to know which one works for you. So let’s get started.
Method 1-Set the Microphone as Default Device
So the first thing you need to check is whether your microphone is set as the default device. There are chances that the mic is not selected due to which the sound is not being played. Follow the given steps to complete the process-
Step 1-On your taskbar, you will notice a speaker icon. Click on the icon.
Step 2- Choose Open Volume Mixer from the given options. Then choose System Sounds.

Step 3- Now click on the Recordings tab. Right-click on the empty area and select “Show Disabled Devices” option.
Step 4- check whether your microphone is there in the list. If yes, then click on the microphone option, and set it as default by the following route- Set Default> Default Device.
Step 5- Also you can enable your mic, by choosing the Enable option, from the right-click list.
Step 6- Once again click on your mic, and highlight it. Then choose Properties.

Step 7- Now in the Level tab, check whether your microphone is muted or not. If yes, then click on the small speaker icon to unmute it. Finally, click on ok.
Step 8- Once again click on Ok to bring the changes you have made into effect.
Now check your microphone. If it is still not working, then move to the next method.
Also Read: Fix Microphone Not Working on Windows 10
Method 2- Update the Audio/ Device Drivers
One of the common reasons behind any Windows issue is outdated drivers. And so can be the case behind Microphone issues. To resolve the Microphone issues, one of the best ways is updating the device drivers. In this case, we will be updating our Audio drivers. So let us begin.
Step 1- Click on the Search bar on the home screen. Type Device Manager.
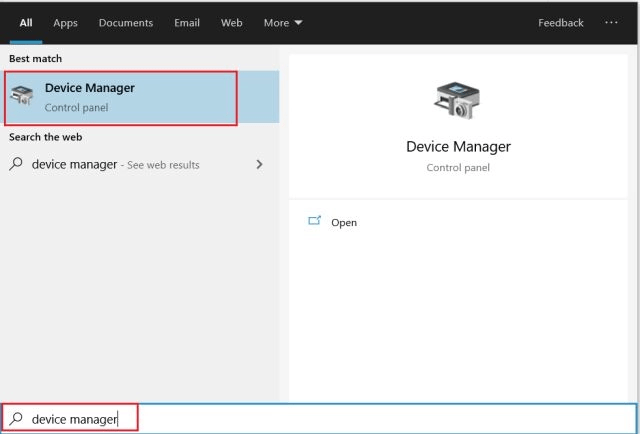
Step 2- From the list of results, click on the top result.
Step 3- Then expand the “Audio inputs and outputs” option. Choose Microphone and right-click on it.
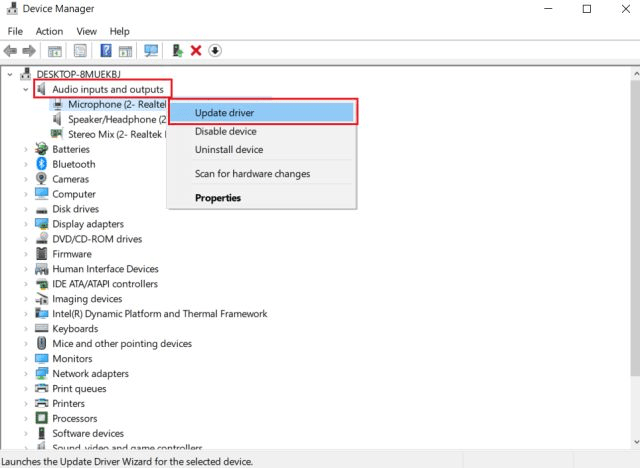
Step 4-Click on the Update Driver option.
Step 5- A New window will open. There will be two options, from which you can choose the Search Automatically option.
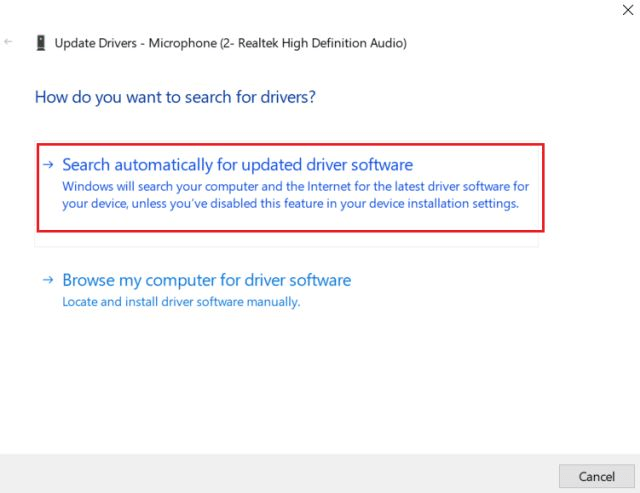
Your system will search for the latest audio driver on the Internet, and update it.
Step 6- After the process is complete, restart your PC.
Now check whether your microphone starts working again. If not, then check out the next method for the proper working of your microphone.
Read: Fix Laptop Battery Not Charging
Method 3- Modify Privacy Settings to resolve Microphone Issues
Sometimes after the Windows update, you need to reset the privacy settings of your microphone. Check whether your microphone has the permission to work normally, if not then modify it by following the given steps-
Step 1- Open the Settings of your PC. You can either use the search bar or press the Windows icon key+I simultaneously.
Step 2- Then click on Privacy. Choose the Microphone option on the left pane.
Step 3- Then enable your “Microphone access to this device” option to On position. Also, turn on the option “Allows the app to access your Microphone” to on position.

Step 4- Now scroll the different apps and choose the apps for which you need access to the mic.

That’s it. Now check your mic and see if it has started working or not.
Method 4- Configure Microphone Settings to resolve microphone issues
Another way to configure the microphone settings is through the Control Panel. Within easy steps, you can configure the Mic settings to restore its working.
Step 1- Open the Run command window by pressing the Windows icon key +R at the same time. Then type “mmsys.cpl” and press Enter.

Step 2- In the new window that opens, look for your microphone device under the Recordings tab. Double-click on it.

Step 3- The Properties window of your microphone will open. Then under the General tab, click on the drop-down arrow against the Device usage option and set it to enable.

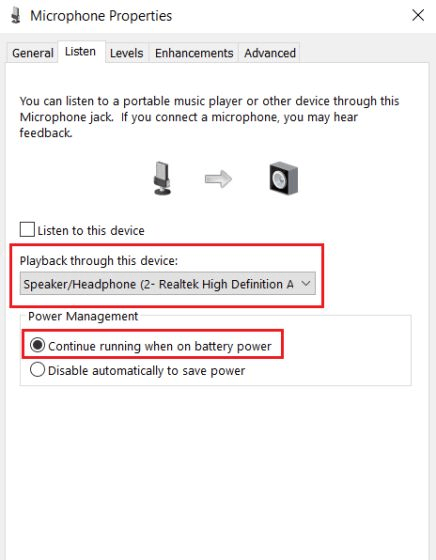
Step 4-Next go to the Listen tab. Choose your microphone from the list of devices. Also, click on the radio button against the “Continue running on battery saver” option.
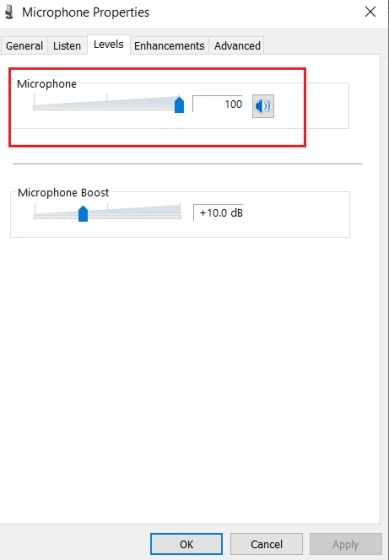
Step 5- Then under the Levels tab, slide the Microphone level to 100.
Step 6- Finally, under the Advanced tab, uncheck the boxes below the Exclusive mode. Click on Ok to save the changes.

Step 7- After making all the changes restart your system to bring the changes into effect.
These changes will surely get your microphone back to working condition.
Recommended: msvcp140.dll is Missing
Method 5-Check the Physical Connections
If you have made all the above changes, then it’s time you check the physical condition of the microphone. Firstly, make a secure connection of the microphone with the PC. The connection should not be loose. So pull out the audio jack or the USB microphone, and plug it back.

Also, make sure that you have plugged your microphone into the right audio jack. You can check the color of the audio jacks, green color is usually for output audio while the pink color is for microphone input jacks.
Lastly, there are some mute switches on the microphone. And so if your mute switch is enabled then your microphones will be in non-working condition.
Wrapping Up
We hope that the above methods would help you resolve microphone issues in Windows 10. If you have any further query then write to us below.


