
Kodi is known for its various dynamic builds and addons. If you are using Kodi for a long time then you would be having a lot of add-ons on your system. But if you are still looking for an addon that is the best for live streaming of shows, especially sports then you can try the Stream Engine addon on Kodi. Developed by Mucky Duck team, the Stream Engine addon offers all the entertainment options to the users. If you love movies or are a big sports lover then this addon will bring everything that you need. It is a complete package that will provide you with all the links and channels.
And so today we are sharing with you the complete guide to install Stream Engine Addon on Kodi and its various versions. But before we move on to the method let us see what Stream Engine has in stock to offer.
What is Stream Engine Kodi Addon?
The stream Engine Kodi add-on is quite a comprehensive one which comes with a lot of content divided into various categories. You can stream content from various genres here. It is one of the easiest and smoothest Kodi addon that you can install and further optimize the functionalities. This addon caters for almost everyone’s expectations and wishes. With this addon, you can get access to TV shows, movies, sports, events, and all live shows, along with the popular series and much more. From entertainment to live sports, you can discover everything with this amazing addon.
Developed by the team of Mucky Duck, this is one of the thrilling Kodi add-on created by them. You can add the Stream Engine addon from the Mucky Repo. The installation of the add-on from this repository is easy as the loading time is very less, and so is quick and excellent.
How to Install stream Engine Addon on Kodi?
Just like the installation process of any Kodi add-on, one needs to follow the same steps. Check out the complete step-by-step guide to complete the installation process successfully.
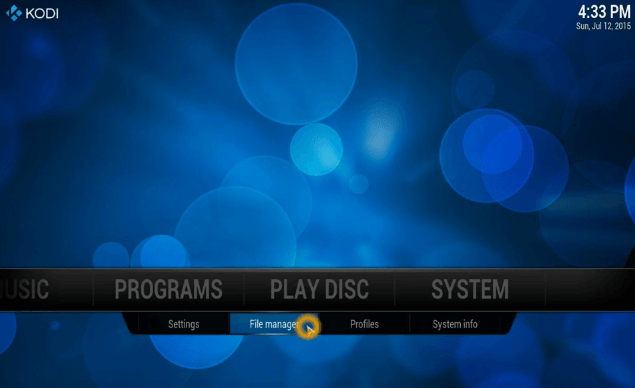
Step 1- From the Kodi home screen, click on the System option. Then from the given options, click on File Manager.
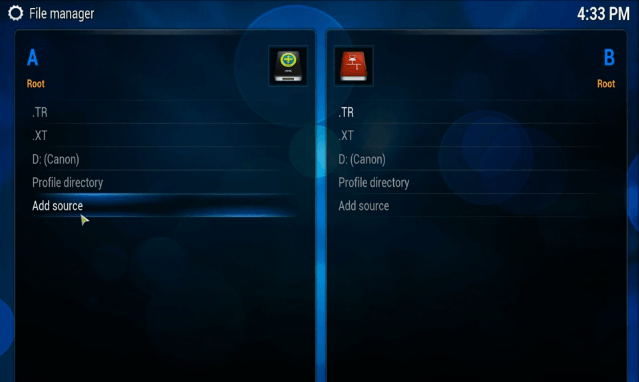
Step 2- In the next page, you will get two mirrored list. Click on Add Source option.
Step 3- In the next window, click on the None txt field tab. This will open the next box. In this box enter the following media path- http://muckys.mediaportal4kodi.ml/.
Step 4- Then click on the Done option. After this step, you will be asked to enter a name to the media source. Here you can give any suitable name like Mucky Duck.
Step 5- Once you complete all the steps, click on the Ok option to complete the downloading of the file.

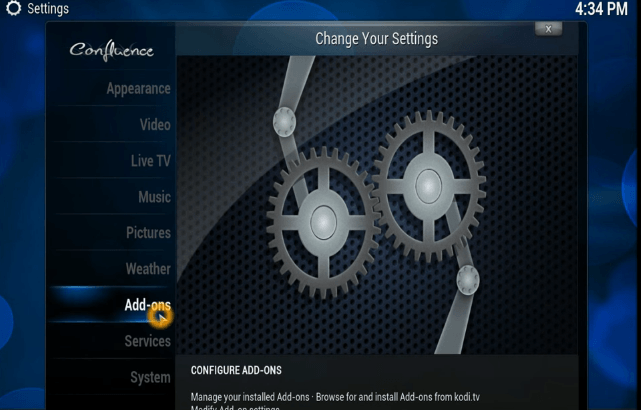
Step 6- Now return to the home screen of Kodi. Then click on system> Settings.
Step 7- You will get a list of options on the left-hand side. Click on the Add-ons option.
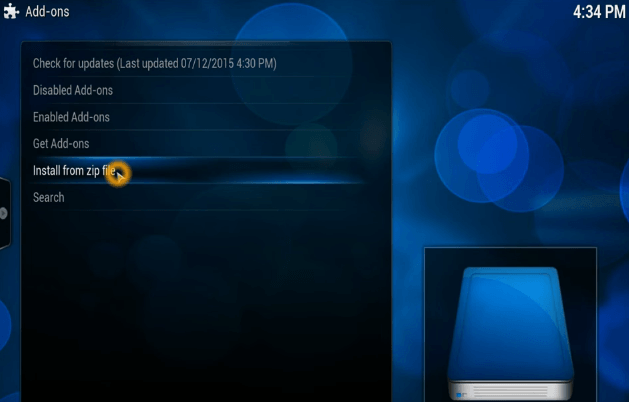
Step 8- The Add-ons page will open. Now click on Install from zip file option. And then look for the file name that you previously saved, like Mucky Duck. Click on it.
Step 9- After you open the folder, click on the zip file name- repository.ndrepo-1.0.2.zip. Note that the name would vary from one version to the other.

Step 10- Wait for a few seconds till the installation of the zip file completes. As the installation of Mucky duck repo completes, you will get a pop-up message at the bottom right corner of the screen.
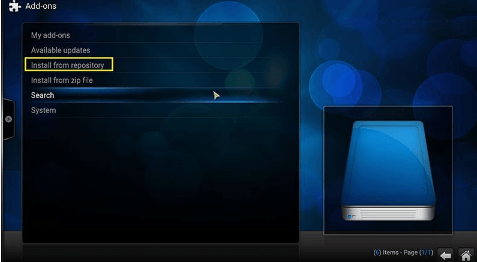
Step 11- Now again navigate back to the Add-ons Page. And click on Install from Repository option.
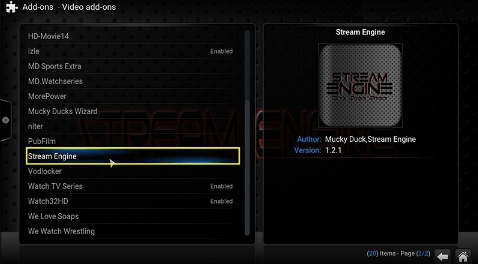
Step 12- Click on Mucky duck Repo> Video add-ons> Stream Engine.

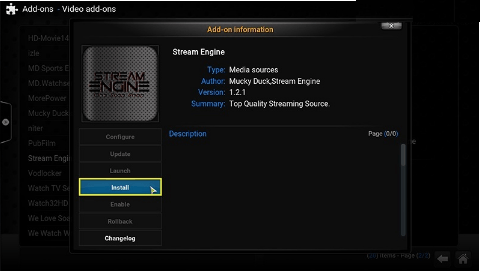
Step 13- The installation page of Stream Engine add-on will open. Click on Install option and wait for a few seconds till the add-on gets enabled on your device.
Step 14- Now you can enjoy the Stream Engine add-on from the Video tab. Under the Video tab, there is an option called Add-ons. Click on it and then you will get your Stream Engine add-on option.
You can now enjoy all the content using Stream Engine for free. You can use this method to install the Stream Engine add-on on Kodi v16 as well as Kodi v17 Krypton. The entire method is similar, however, be careful while using any of the Kodi builds and add-ons. Always use a strong VPN to be safe. Know more about the best VPN service here.
Why Use a VPN with Kodi?
A VPN service allows you to browse the internet, stream or download content, play games and perform much more activities, with security and flexibility. And if you do not use a VPN while using the Internet then your activities and identity get exposed to everyone. This means that anyone can spy you and trace you through your activities. VPN is one of the best choices if you want to stream content on the Internet without putting your privacy at risk. VPN encrypts your data and so your actions are kept hidden from others and no one will be able to know what you are streaming online. Even your ISP will not be able to track you and you can continue enjoying your favorite content without any chance of eavesdropping.
With the high-end protections and security provided by a VPN service, you can focus on your sports, shows, movies and TV series without any worry. Not only this you can also discover and enjoy content from all over the world, even the content that has been blocked in your region. With a strong and efficient VPN service, you can bypass all kinds of geographical restrictions and enjoy the most out of the Stream Engine Kodi add-on. Stream Engine is a powerful streaming add-on, but it becomes even better when you pair it with a VPN.
There are millions of VPN services available but it is important to find an option which is reliable and allows you to, effortlessly and securely stream content. Some of the well-known VPN services is IPVanish, ExpressVPN, and NordVPN.
Wrapping Up
This was all about the Stream Engine Kodi add-on. We tried to convey all information regarding the entire process to install Stream Engine add-on on Kodi and hope that it was useful to you guys. In case of any confusion or problem, share it with us in the comment section.


