
IPTV stalker addon is one of the top solutions for users who want IPTV on their TV sets. The Kodi IPTV stalker addon features deliver the TV content over the internet. Full form of IPTV is Internet Protocol Television. IPTV stalker add-on delivers the TV data using signals which are based on the logical internet protocol.
The IPTV technology also uses the traditional form of data transmission to stream media including satellite, terrestrial, and cable signals. The main focus of the IPTV Stalker add-on is on the countries including the United States, the United Kingdom, and Canada.
Even the database of channels is also from these respective countries by itself.
So let’s learn how to install IPTV Stalker Addon on Kodi to utilize all its features.
What is IPTV Stalker?
Users can also get their hands on various other channels with the help of IPTV stalker add-on. The IPTV stalker add-on is not supported by the Kodi.
The IPTV stalker add-on is a combination of TV contents which are streamed on the internet. If you face any problem, then contact the IPTV stalker add-on developers and do not contact the Kodi team since Kodi does not support IPTV stalker add-on. You can also get various other channels with the help of IPTV Stalker channel list 2018.
Below you will find a step by step guide on how to install IPTV stalker add-on and also on how to install IPTV stalker on Android.
How to install IPTV stalker Addon on Kodi
Just follow the steps mentioned below for successful installation of IPTV stalker add-on on your Kodi.
Before installing, you need to first download IPTV Stalker file for your KODI. A lot of websites don’t offer the download link to IPTV Stalker, but we will help you with it.
IPTV Stalker 2019 Download
It is important that you download and keep this file as such addons get deleted very soon from the internet.
Download IPTV Stalker from here: http://www51.zippyshare.com/d/1yG7p5U5/285512/repository.dnarepo.zip
Simply copy the above link and paste it into your browser. Once the download is completed, you can start installing IPTV Stalker addon on your Kodi device.
Note that the same file of IPTV Addon will work on Kodi Krypto, Jarvis and other versions.
Step to Install IPTV Stalker on Kodi
After you download the IPTV Stalker addon, simply follow the given steps below.
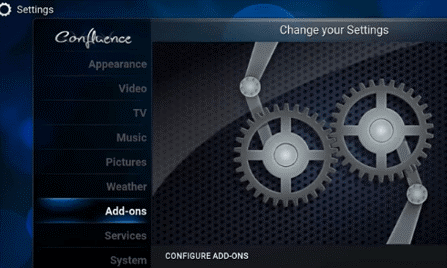
Step 1 – Launch Kodi Media Player dashboard. Click on the system settings.

Step 2 – After entering the system settings, find the settings option. Select it.

Step 3 – On entering the setting menu, locate the add-ons option. Click on it.
Step 4 – Click on the “Install from ZIP file” option.
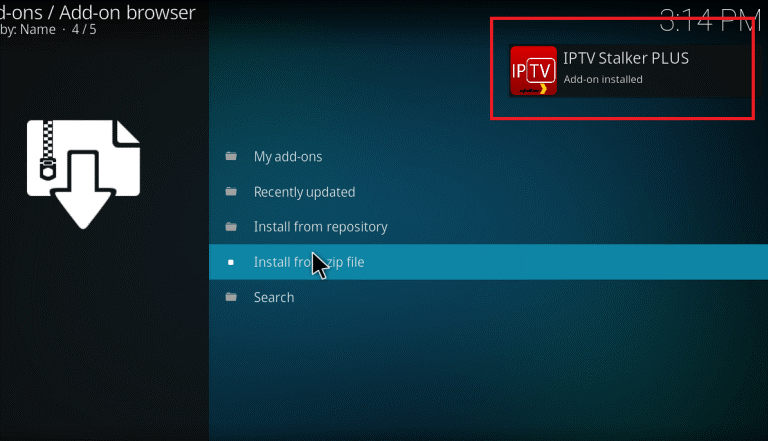
Step 5 – Locate the downloaded file from your drive and click OK. You can find the file in your downloads folder.

Step 6 – Hit the install button to install the IPTV stalker add-on. Wait for the installation to be completed. On completion, a window will pop up indicating “Add-On Installed”. Now, return back to the home screen again. Click on the Video manager option and then, choose the Add-Ons option to open it.
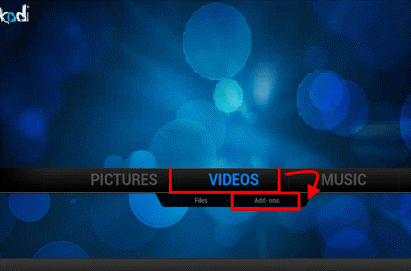
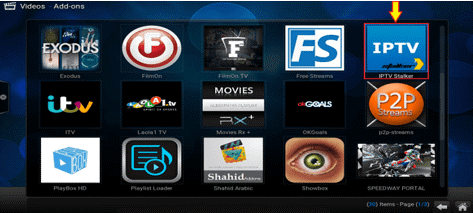
Step 7 – on clicking the Add-Ons option, all the Video Add-ons installed on your Kodi will appear. Click on Kodi IPTV Stalker Add-on from the list to open it.
Thus you have successfully downloaded and install IPTV Stalker Addon on your Kodi.
How to Install the IPTV Stalker Add-on for Kodi v17 Krypton?
To install IPTV stalker add-on for Kodi version 17 krypton, then follow the step by step instructions mentioned below for successful installation of IPTV Stalker repo.
Step 1 – Open Kodi home screen. Click on the Add-ons options.
Step 2 – Then click on the Install from zip file option. Select the file named repository.dnarepo.zip. This file is the same that you downloaded before.
Step 3 – Wait for a few seconds. On completion, you will be notified.
Step 4 – Click on the Install from Repository option > click on the Video add-ons > choose the IPTV Stalker add-on > hit the Install button.
Step 5 – Return back to the Kodi Home screen > click on the Add-ons option > click on the Videos add-ons > choose the IPTV Stalker.
You have successfully installed the addon to your Kodi Krypton.
How to Install the IPTV Stalker on Kodi v16 Jarvis?
To install IPTV stalker add-on for Kodi v16 Jarvis, then follow the step by step instructions mentioned below for successful IPTV stalker download and installation.
Step 1 – Launch the Kodi Jarvis v16. Select the system icon to open the system settings.
Step 2 – On entering the system settings, locate Add-ons option. Click on it.
Step 3 – Within add-ons menu, find the Install from zip file option. Click on it.
Step 4 – Then, click on the file named as repository.dnarepo.zip that you downloaded earlier.
Step 5 – Wait for a few seconds. You will get the notification indicating that the add-on is now enabled.
Step 6 – Then, click on the Install from Repository option > click on the Video Add-ons > then, choose the IPTV Stalker > finally, hit the Install button.
Step 7 – Click on the Videos > then, click on the Video Add-Ons > choose the IPTV Stalker
That’s it.
Note: The method to install IPTV Stalker Addon is same for all the versions. You just need to download the addon first and then add it via ZIP file option.
IPTV Stalker Not Working?
IPTV stalker add-on provides its user with a whole new joy itself. It allows you to watch the TV channels from multiple countries.
In case, you get errors and if your IPTV is not working properly, You need to make sure that IPTV stalker add-on installations are correct. If installed correctly, then check for an update.
It might happen that your IPTV add-on is not updated due to which you are suffering from issues related to IPTV stalker add-on not working properly.
If your IPTV Stalker Kodi addon due to some reasons is not working correctly on our Kodi device then contact the IPTV stalker team. In case you are still facing issues then make sure that your ISP is not blocking IPTV stalker add-on to stream contents from the internet.
So, use a VPN to bypass your internet provider. You can use a VPN connection like IPVanish, IVACY, ExpressVPN. A VPN connection will ensure no copyright infringement, no ISP throttling and will also provide you with online privacy. VPN connection will make watching online videos more safe and secure for you.
The IPTV stalker add-on is not a part of Kodi team. Hence, if you face any problem and need an expert advice, then always contact the IPTV stalker team and not the Kodi team since they do not officially support IPTV stalker add-on.
Conclusion
Everyone must add IPTV stalker add-on to their list with other add-ons. In order to install the IPTV stalker add-on, then just follow the instructions mentioned above which will help you to download and install IPTV stalker addon on your Kodi without any problem.
The step by step guide mentioned above is easy to understand and will help you out while installing and downloading the IPTV stalker add-on.


